How to Deploy a Stateful CRUD Web Application to Minikube(Local Cluster) and Google Cloud Kubernetes Engine(GKE)
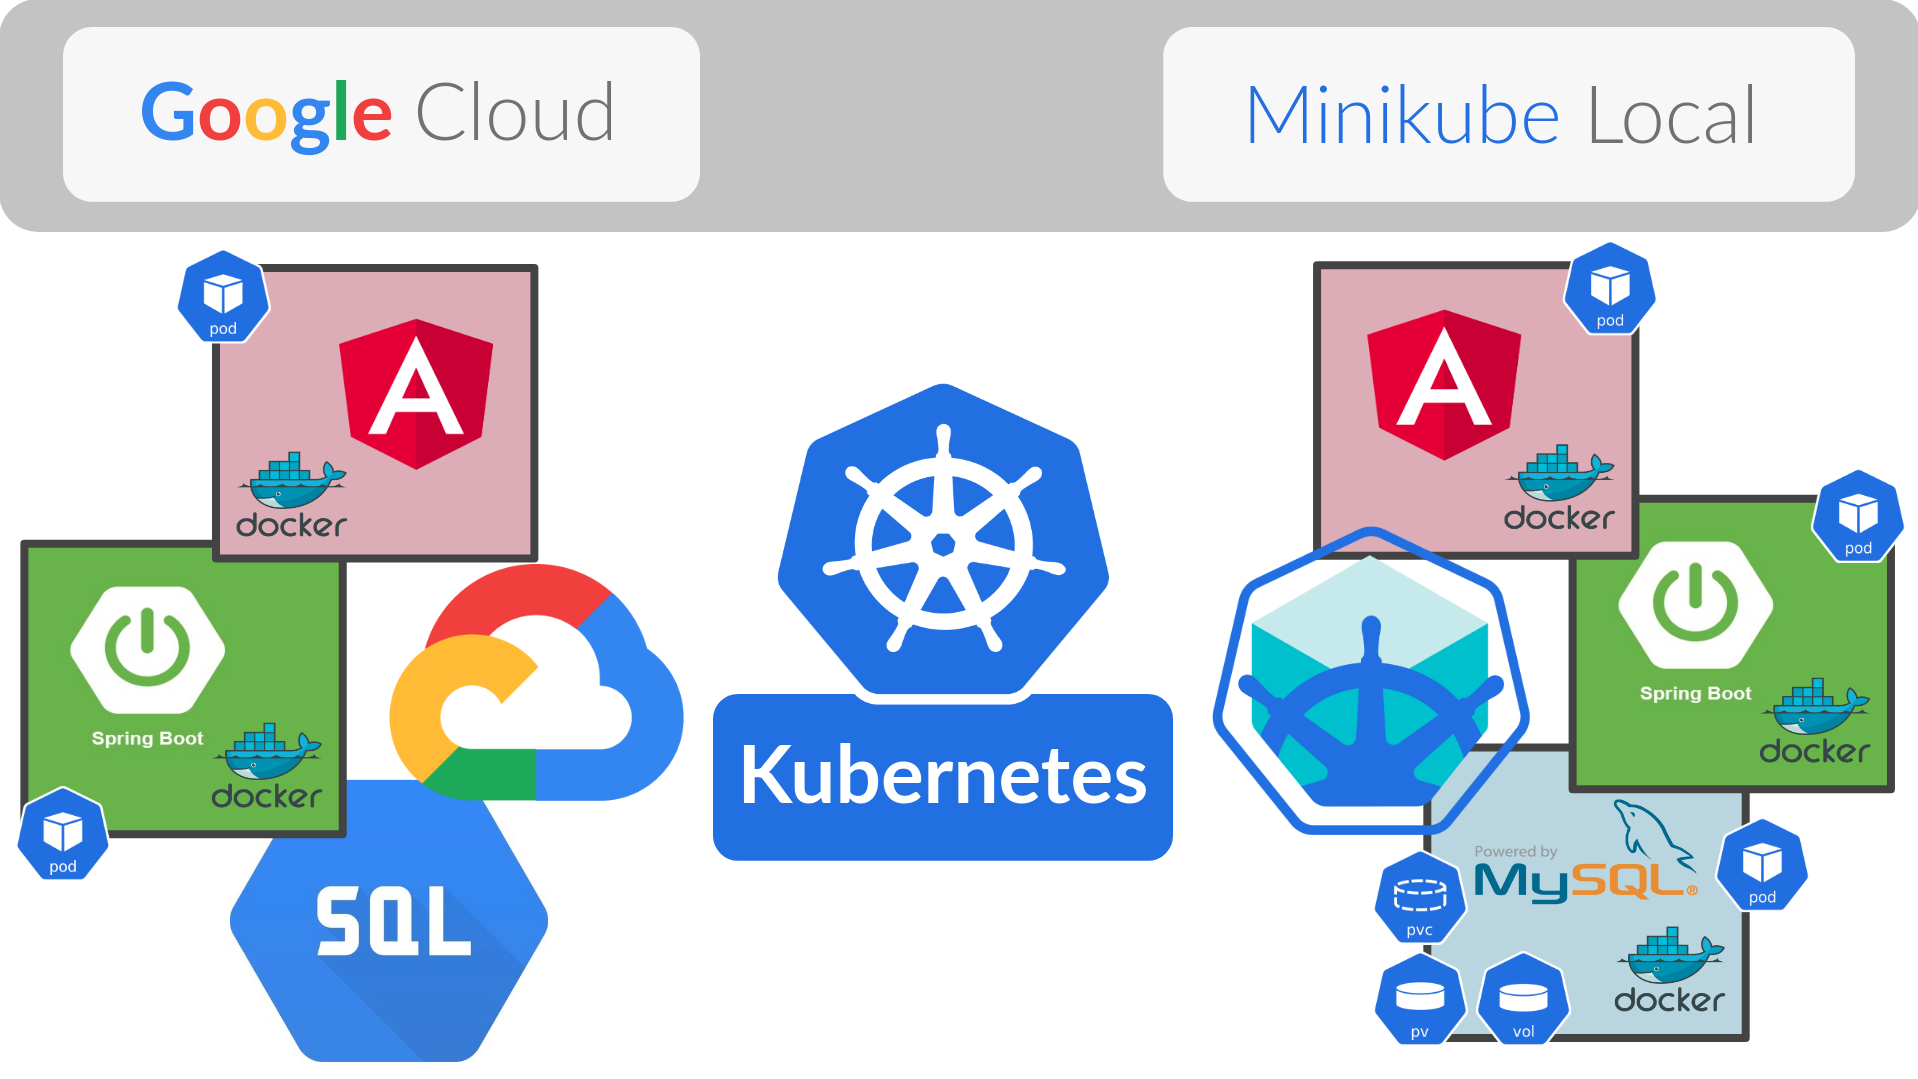
Multi-container stateful web application deployment to different Kubernetes environments
👋Introduction
Kubernetes is very helpful to understand the Cloud architecture and how we got where we are today. When you start to work with Kubernetes without understanding why we need it, it may be felt overwhelming. But if you know due to what requirements this product appeared and you actually need to use it, Kubernetes is fun to understand.
I created a CRUD application and used Docker/Docker-compose for local development in my previous post. In that post, I told “I am also planning to use Kubernetes for this project in the future” so this is the day🎉. We are going to deploy Angular 9, Spring Boot, and MySql stack Stateful CRUD web application to Google Cloud Kubernetes Engine(GKE) and local Minikube cluster for testing and development purposes.
The final GitHub repository is below. Frontend and Backend repositories were added as git submodules therefore run git submodule update --init --recursive command to download them too.
👈What This Post is NOT About👉
- Not step by step guide. I am just going to explain some important parts, some code snippets, some screenshots, and a GitHub repository for the entire project which you can dive into.
- Not Kubernetes 101
- Not a deep down explanation of Kubernetes, just an example of its usage
- Not a Spring Boot CRUD web application tutorial. There are enough of them out there.
- Not a production-ready code but definitely helps.
👉What This Post is About👈
- To show how you can deploy an application to Kubernetes.
- To show how you can test an application on local with Kubernetes.
- To give you a reference codebase.
🚨Prerequisites
- Docker knowledge
- Basic Kubernetes knowledge
- Basic Google Cloud knowledge (like project creation, service activation)
- This project uses the codes of the previous post so it is helpful to check it too.
📖TLTR;
1- What is Minikube
2- Install and Run Minikube
3- What is Api Server
4- What is kubectl
— UI Interaction Example
— REST API Interaction Example
5- Usage of Google Container Registry as Private Container Registry
— How to Pull/Push Images to Google Container Registry
— Use gcloud Credential Helper to Configure Docker
6- Configure Minikube to Access Private Container Registry
— Download GCP Project Default Account Private Key
— Create Kubernetes Secret to Pull Images
7- Create Deployment YAML File for Kubernetes
— Convert Docker-compose YAML to Kubernetes YAML
— — Kompose Version
— — kubectl Version
— Angular Deployment YAML
— Spring Boot Deployment YAML
8- Create Internal Services
— Service Pod Relation (label, Endpoint Object)
— Angular Service YAML
— Spring Boot Service YAML
9- Expose Application to Outside World
— Create Load Balancer as External Service
— Configure Angular to Communicate Backend Over Kubernetes Network
10- Create a Deployment to Minikube
— Deploy to Minikube
11- Create a Deployment to Google Cloud
— Activate and Connect Google Cloud SQL
— Connect Spring Boot to Google Cloud SQL
— Create a Kubernetes Cluster at Google Cloud with GKE
— Deploy to Google Kubernetes Engine(GKE)
References
What is Minikube
So we are developing or want to test an application that is going to or already works with Kubernetes. If we want something like that may need to look for a local solution. Therefore, the questions that we should ask are “How can I create a Kubernetes setup on the local machine?” or “do I have to create a whole Kubernetes cluster myself😟?”.
Thank god NO🎊. What we need is Minikube a ONE Node cluster.

minikube is local Kubernetes, focusing on making it easy to learn and develop for Kubernetes.
All you need is Docker (or similarly compatible) container or a Virtual Machine environment, and Kubernetes is a single command away:
minikube start
Install and Run Minikube
I recommend Minikube website installation documentation, it covers the installation process for all operating systems.
🧠One more important note; We need a container or a virtual machine manager, such as Docker, Hyperkit, Hyper-V, KVM, Parallels, Podman, VirtualBox, or VMWare in order to run Minikube.
I have docker on my machine therefore problem fixed😏
$minikube start --driver=docker
🧠Note: If you are using Docker with root privileges, you are probably going to get errors. You can check the following page for a solution.
What is Api Server
We created a Kubernetes cluster on our local with the help of Minikube so how we can communicate with it.
There are worker nodes and master nodes on Kubernetes. As the name indicates our application run by worker nodes so what does the master node responsible for?
A master node is a node which controls and manages a set of worker nodes (workloads runtime) and resembles a cluster in Kubernetes
4 processes must be installed on every Master Node; Api Server, Scheduler, Controller Manager, and etcd.

They all have particular responsibilities but our focus is Api Server.
The API Server services REST operations and provides the frontend to the cluster’s shared state through which all other components interact.
This means the Api Server is our connection with the cluster. So what kind of client we can use to interact with it.
What is kubectl
The kubectl command line tool lets you control Kubernetes clusters.
Follow the link to install and set up kubectl;

We can interact with Kubernetes now🙂
But kubectl is not the only way. You also interact with the Kubernetes cluster through a UI or API

UI Interaction Example
We already installed Minikube and it provides a dashboard.
$minkube dashboard

Google Cloud Kubernetes Engine also provides a dashboard too.

REST API Interaction Example
If we want to directly access the REST API, there are steps we have to follow for locating and authenticating. I am going to use an HTTP Proxy to Access the Kubernetes API which is shown in the Kubernetes Documentation. Also, you can find more detail at the Kubernetes official documentation about Directly accessing the REST API.
$kubectl create deployment node-hello --image=gcr.io/google-samples/node-hello:1.0 --port=8080
deployment.apps/node-hello created$kubectl proxy --port=8080
Starting to serve on 127.0.0.1:8080
Now, we can see all API endpoints,

Don't forget to delete node-hello deployment.
$kubectl delete deployment node-helloUsage of Google Container Registry as Private Container Registry
We have to pass our docker images somehow to Kubernetes deployment. There are 3 options;
- Use Docker Hub (Default)
- Use Private Registry
- Use Local image(just works for the local cluster)
I am going to choose the Private Registry option and Google Container Registry as a private container registry.
🧠Note: If you don't have a Google Cloud account don't worry you can sign-up right away and google gives you 300$ worth of credit to spend.

How to Pull/Push Images to Google Container Registry
- You have to install Google Cloud SDK to interact with Google Cloud. It is very simple just follow the instruction at Google Documentation.
2. We have to push our image to Google Container Registry. We can use Docker for that but we have to configure it.
🧠Note: you can also use gcloud builds submit which handle build and push steps.
Use gcloud Credential Helper to Configure Docker
First, we have to configure docker. Check the official documentation.
$gcloud auth login
$gcloud auth configure-docker
Docker is configured to interact with Google Container Registry. We are going to simply push our images to Google Container Registry now. You can check the official documentation for details.

HOSTNAME → gcr.io

PROJECT-ID → bionic-trilogy-298608 (the project you created for container registry)
IMAGE → It is up to you. We are going to give quote-application-api for BE and quote-application-web for FE.
TAG → default is the latest so we just leave it.
$docker push gcr.io/bionic-trilogy-298608/quote-application-apiConfigure Minikube to Access Private Container Registry
We have to configure Minikube to pull Docker images from Google Container Registry because it is a private container registry.
Download GCP Project Default Account Private Key
Follow the steps in the image below for this section.
⛔️DO NOT SHARE(commit/push) ACCOUNT PRIVATE KEY FILE!!!

We downloaded the project default account private key. I will put it under the resource folder of the Spring Boot project. Because we are also going to use it for interacting with Google Cloud SQL.
Create Kubernetes Secret to Pull Images
We need to create a secret for Minikube to pull images from Google Cloud Container Registry and going to assign the secret as imagePullSecrets.
$kubectl create secret docker-registry bionic-trilogy-key \
> --docker-server=https://gcr.io \
> --docker-username=_json_key \
> --docker-password="$(cat bionic-trilogy-key.json)" \
> --docker-email=[valid@email.com]
$kubectl patch serviceaccount default \
> -p '{"imagePullSecrets":[{"name":"bionic-trilogy-key"}]}'
$kubectl get serviceaccount default -o yaml
Now, Minikube can download Docker images from Google Container Registry
Create Deployment YAML File for Kubernetes
We, as developers, don’t create a Pod, Service, etc. Kubernetes has abstraction layers for components so we just create a Deployment and Kubernetes handles the rest.

I am not going to give the detail of a deployment yaml file because Kubernetes has very detailed documentation about it. You can find it on this link.
Convert Docker-compose YAML to Kubernetes YAML
There is a tool called Kompose. Its installation is very simple, and you may use it to convert the docker-compose deployment yaml file into Kubernetes deployment yaml files. But I don’t like the end result, It seems too verbose to me. On the other, you may want it to use to scaffold a template, but kubectl already covers that part and I like the kubectl version.
Let’s see how can you use both of them;
Kompose Version
I had a docker-compose deployment file that I created in my previous post. Also, you can find its Github repository too. I will use the following command to convert it;
$kompose convert -f docker-compose-deployment.yamlAnd the terminal output;

if we look into springboot-app-deployment.yaml;

kubectl Version
If we want to use kubectl to create a deployment, we are only gonna need a docker image. You can follow the spring official example Spring Boot Kubernetes example for this part. I am going to use the project mentioned there.
$kubectl create deployment demo --image=springguides/demo --dry-run -o=yaml > deployment.yamland output deployment.yaml file is;

Angular Deployment YAML
We are going to use this deployment file for the Angular application.
Spring Boot Deployment YAML
We are going to use this deployment file for the Spring Boot application.
Create Internal Services
Service Pod Relation (label, Endpoint Object)
I am going to explain very generally. Pods are ephemeral which means they can die very easily and every time they created a new IP address is given to them. So imagine you have a FE pod and a BE pod.

FE needs to BE’s IP address to communicate it, and you somehow pass BE’s IP address to FE and FE achieve to connect to BE.

But what if the BE pod dies and a new one is created instead. How will FE know BE’s IP?

So we put an internal service. Service has a permanent IP address and FE can communicate service. We almost solve the problem. So how does the service knows the pod's IP?

When you deploy a service you set a label selector value. The service interacts with pods that have the same label. Also, the service gets help from the endpoint object to find the labeled pod’s IP.

So this is why we need internal services to establish communication between pods.
Angular Service YAML
We are going to use this service deployment to connect the Angular application.
Spring Boot Service YAML
We are going to use this service deployment to connect the Spring Boot application.
Expose Application to Outside World
When we want to expose the application to the outside, we encounter 4 choices. They are ClusterIP, NodePort, LoadBalancer, and Ingress. I am not going to give detail but you should read about them. you can easily find a detailed explanation on the internet, also I leave these links here(link1,link2). If you look at the Spring Kubernetes tutorial, they are using port-forward but it is not ideal. In this post, I am going to use LoadBalancer.

Create Load Balancer as External Service
Using a
LoadBalancerservice type automatically deploys an external load balancer. This external load balancer is associated with a specific IP address and routes external traffic to a Kubernetes service in your cluster.
This means if I deploy the LoadBalancer service to GKE, Google Cloud LoadBalancer going to take control.
Configure Angular to Communicate Backend Over Kubernetes Network

If you know docker networking, the idea is very similar. FE should not communicate with BE service by IP address. We can directly give the service name to Angular and Kubernetes handle redirection. We are adding the following line to the Nginx configuration file. It is a reverse proxy and instead of localhost, we give application-api-service which is the name of Spring Boot Service.
location /api/v1{
            proxy_pass http://application-api-service:8080/api/v1;        }
Create a Deployment to Minikube
Currently, we have 5 deployment files.
- LoadBlancer service deployment
- Front-end deployment
- Front-end service deployment
- Back-end deployment
- Back-end service deployment
and we are going to add 2 more for the Database. There is a very good Kubernetes official example and I am going to use their yaml because it fits just perfectly.
6. mysql-deployment.yaml
$ kubectl apply -f https://k8s.io/examples/application/mysql/mysql-deployment.yaml7. mysql-pv.yaml
$kubectl apply -f https://k8s.io/examples/application/mysql/mysql-pv.yamlHaving 5 separate deployment files is a pain, so let's bundle them and create one huge deployment file. I named it kubernetes-deployment.yaml
Deploy to Minikube
Initial minikube status,

- Create PersistentVolume and PersistentVolumeClaim
$kubectl apply -f https://k8s.io/examples/application/mysql/mysql-pv.yaml2. Create MySql deployment, MySql Service
$ kubectl apply -f https://k8s.io/examples/application/mysql/mysql-deployment.yaml3.Connect MySql and Create Database Manually(there are other ways too but for now I will create it manually)
$kubectl run -it --rm --image=mysql:5.6 --restart=Never mysql-client -- mysql -h mysql -ppasswordmysql> CREATE DATABASE kubernetes_application;
mysql> SHOW DATABASES;
+------------------------+
| Database               |
+------------------------+
| information_schema     |
| kubernetes_application |
| mysql                  |
| performance_schema     |
+------------------------+
4 rows in set (0.00 sec)mysql> exit
4. Deploy kubernetes-deployment.yaml (which contains LoadBalancer, AngularService, AngularDepoyment, SpringBootService, SpringBootDeployment)
$kubectl apply -f kubernetes-deployment.yaml
Let’s see the current status

All is fine but LoadBalancer is pending, The solution is the minikube tunnel
A LoadBalancer service is the standard way to expose a service to the internet. With this method, each service gets its own IP address.Services of type
LoadBalancercan be exposed via theminikube tunnelcommand.
$minikube tunnel
We are going to use LoadBlancer IP and Port to connect the application so in this case, it is 10.108.150.246:4200

and perfect, it is working🎉🎉

If you want to stop all the part related to the application, you should use the following commands;
$kubectl delete deployment,svc mysql
$kubectl delete pvc mysql-pv-claim
$kubectl delete pv mysql-pv-volume
$kubectl delete -f kubernetes-deployment.yaml
Create a Deployment to Google Cloud
There is a Google Tutorial too, you can check it for a better understanding of the concepts. When we are deploying Google Cloud most of the things will be the same with the Minikube deployment. The only difference we are going to use Google Cloud SQL. To connect Google Cloud SQL, we are going to use the Spring Cloud GCP library’s SQL package.
Activate and Connect Google Cloud SQL

We created an SQL instance

It is time to create kubernates_applicationdatabase.

Connect Spring Boot to Google Cloud SQL
We were using classic mysql-connector-java
<dependency>
    <groupId>mysql</groupId>
    <artifactId>mysql-connector-java</artifactId>
    <scope>runtime</scope>
</dependency>
and its aplication.properties configurations
spring.jpa.hibernate.ddl-auto=update

spring.datasource.url=jdbc:mysql://${MYSQL_HOST:localhost}:3306/${MYSQL_DATABASE:kubernetes_application}
spring.datasource.username=${MYSQL_USER:root}
spring.datasource.password=${MYSQL_PASSWORD:password}
We can continue to use this classic method if we create a Cloud SQL Proxy. But it is more appropriate for local testing, not for production. Instead, we are going to use the Spring Cloud GCP library.

There are code sample;

and it takes us to a GitHub repository that gives a code sample and configuration instructions.

- We are going to add the new dependency to pom.xml and turn a comment into the old one.
<!--        <dependency>-->
<!--            <groupId>mysql</groupId>-->
<!--            <artifactId>mysql-connector-java</artifactId>-->
<!--            <scope>runtime</scope>-->
<!--        </dependency>-->
<!--         https://mvnrepository.com/artifact/org.springframework.cloud/spring-cloud-gcp-starter-sql-mysql -->
        <dependency>
            <groupId>org.springframework.cloud</groupId>
            <artifactId>spring-cloud-gcp-starter-sql-mysql</artifactId>
            <version>1.2.6.RELEASE</version>
        </dependency>
2. we are going to update theapplication.properties
spring.jpa.hibernate.ddl-auto=update

#spring.datasource.url=jdbc:mysql://${MYSQL_HOST:localhost}:3306/${MYSQL_DATABASE:kubernetes_application}
spring.datasource.username=${MYSQL_USER:root}
spring.datasource.password=${MYSQL_PASSWORD:password}

spring.cloud.gcp.sql.database-name=kubernetes_application
spring.cloud.gcp.sql.instance-connection-name=bionic-trilogy-298608:us-central1:kubernetesdemo
database-name → the database we created in kubernetesdemo
instance-connection-name → you can find the name at “GCP SQL Overview page” under the Connection name

3. You can use this set up on your local minikube cluster too. But you need credentials to connect GCP SQL. Spring Cloud GCP SQL looks for an environment variable as default. The environment variable is GOOGLE_APPLICATION_CREDENTIALS . The credential exists in GKE there for it is not a problem. We have to create the same environment variable and set the value as the location of the credential file which we download at the “Download GCP Project Default Account Private Key” section. So we just add a new environment variable. I am going to show how you can do it in IntelliJ.

Create a Kubernetes Cluster at Google Cloud with GKE
- First, we should activate Google Kubernetes Engine(GKE) to create a Kubernetes cluster

2. We activated GKE, it is time to create a cluster. When you select Kubernetes Engine from the side menu, step 1 will appear just click “CREATE CLUSTER”. You can use gcloud commands too, but it is not beginner-friendly. Now, you can create a custom cluster like step 2-a or select a pre-configured cluster like step 2-b. Pre-configured cluster assures the cheapest test options, the downside is you may face permission problems like connecting to the private container registry even though they are at the same project. I am going to create a custom cluster that is very similar to the pre-configured one but with more permissions.

3. We created our first cluster. GKE gives 3 nodes as default but you can change it.
4. As you know we are using kubectl to interact with Kubernetes. So the question, How can we use kubectl to interreact multiple clusters? kubectl uses context configuration to decide which cluster it interacts with.

so we should change the current context with GKE. It is very simple, but we have to use gcloud commands for this. First, let’s check our GKE clusters.
This is the cluster that we created. Its location is us-central1-c , note this information. We have to create credentials to connect our kubectl to GKE. It is one line of code.
$gcloud container clusters get-credentials my-first-cluster-1 --zone=us-central1-clet’s check our context.
And that is all we can interact with GKE now.
🧠Note: If you want to work with Minikube again you should change the context. $kubectl config --help

$kubectl config get-contexts
CURRENT  NAME                  CLUSTER   AUTHINFO   NAMESPACE
   *     gke_bionic-trilogy... gke_bi... gke_bi...
         minikube              minikube  minikube   default
to switch
$kubectl config use-context minikubeDeploy to Google Kubernetes Engine(GKE)
We bundled all our deployment files in the previous section except pv, pvc, MySqlService, and MySqlDeployment. In this section, we just need the bundled deployment file. Also, we have to create a new BE docker image because of the code changes,
- Create a new BE image and push it.
2. Deploy GKE
initial state

$kubectl apply -f kubernetes-deployment.yaml
$kubectl get all
You can also check with GCP GKE UI
Everything seems fine. Let’s check 35.225.251.121:4200

And we are ALIVE🎊🎊
If you want to stop the application
$kubectl delete -f kubernetes-deployment.yaml